Many do not know that vanilla beans comes from vanilla orchids. Most of us associate vanilla extract with baking cookies and our favorite vanilla scented candle.
It came as an extreme shock to me when I did research on different orchid species and came across one called the vanilla orchid. Once I dug deeper about information regarding this type of orchid, I realized this is where vanilla extract comes from–who knew!
If you have a vanilla orchid, then you can produce your own vanilla beans. Once you have your own vanilla bean, then you can go on to make many different homemade goods from vanilla bean extract.
Throughout this post you will find information regarding vanilla beans and orchids including information on:
- What vanilla orchids are
- Vanilla orchid care
- How to tell if your orchid is growing vanilla beans
- Cultivating and extracting vanilla beans from your vanilla orchid
- Ways you can use your vanilla beans

Table of Contents
What are Vanilla Orchids?
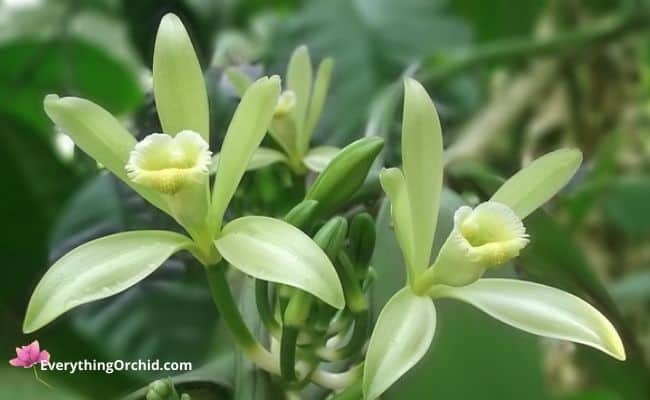
Vanilla orchids are a unique type of orchid. This species of orchids is one of the many three-hundred other kinds of orchids.
A vanilla orchid, or scientifically known as Vanilla plantifolia, belongs to the evergreen vining orchid family.
This orchid grows to be 8 to 10 feet tall indoors. While in their natural habitat, these orchids will grow 75 to 100 feet tall and grows at the base of trees. This orchid will form a vine that will grow up the base of the tree.
Vanilla orchids grow in tropical climates. This species of orchid is native to areas in Central America, in countries like Mexico.
If properly cared for, vanilla orchids can have up to a dozen or more blooms at a time on a vine. Vanilla orchid blooms may even develop vanilla beans after a period of time.
Vanilla Orchid Care
Vanilla orchids care is rather different from most types of orchids. Before you can even think of your orchid growing vanilla beans and having to extract them, you have to properly care for your orchid.
This kind of orchid requires specific amounts of light, soil, fertilizers, water, temperature, and humidity. If properly cared for, you will eventually see this orchid sprout vanilla beans.
Below you will find information to help provide your orchid the best and proper care to thrive and survive.
Vanilla Orchids and Light
Unlike most orchids which require lots of light, vanilla orchids require minimum light and prefer to be in the shade.
Most species of orchids require up to 12 hours of sunlight each day. Whereas the vanilla orchid prefers morning sunlight and then shade for the remainder of the day.
To make sure your vanilla orchid receives the best morning sunlight, be sure to place it in an area that receives the most sunlight in the morning.
It is critical that you do not place your vanilla bean orchid in direct sunlight throughout the course of a whole day. This will go on to damage your orchid.
If a vanilla orchid receives too much sunlight, you will notice:
- the leaves turning yellow
- blooms falling off
- vines will die
- soil and roots drying up quick
- lack of growth
- and you will slowly kill your orchid
Soil and Vanilla Orchids
One thing that vanilla orchids do have in common with other species of orchids, is the type of soil that these plants need in order to survive.
When you pot your vanilla orchid, you should consider using bark and sphagnum moss soil mixtures. In your pot, you should use half bark mixtures and half moss mixtures.
Vanilla orchids will not survive in normal potting soils. It is crucial that you use the right type of soil for this kind of orchid, otherwise your plant will quickly die.
The soil should also have pH levels between 6.6 and 7.5.
Fertilizing Your Vanilla Bean Orchid
To maintain these high pH levels, you should consider fertilizing your vanilla orchid. Orchids like fertilizers that are rich in potassium, phosphorus, and nitrogen.
Most orchid fertilizers contain these nutrients, and will help improve the growth and overall vibrant-ness of your orchid. For vanilla orchids, you should use orchid fertilizers to help keep the pH levels of your soil high.
You should only fertilize your orchid every 2 to 4 weeks.
Watering Vanilla Orchids
Like all orchids, it is crucial that you properly water your orchid. Water is essential in the air flow and nutrient absorption for all orchids.
Vanilla orchids get relatively big (8 to 10 feet tall indoors). Therefore it will require more water than most species of orchids. But since these orchids can drastically vary in height and size, it is hard to precisely state how much water this orchid will need.
Instead of exacts amounts of water, you should pay attention to the moisture levels of the soil. The soil and potting medium of your orchid should be damp.
This orchid requires damp soil because of the type of roots that grow out of it. Vanilla bean orchids grow air roots. This type of root requires moisture in order to receive key nutrients (such as air) and to grow.
You should only give your vanilla orchid enough water to make the soil and potting medium damp.
In most cases, you should only have to water your vanilla orchid every 7 to 10 days. You should always check the moisture levels of your orchid’s soil before watering it.
Never overwater your orchid or leave standing water in the bottom of the pot, as too much water can kill your plant.
If you need more assistance for watering your orchid, check out how to properly water your orchid.
Best Temperatures for Vanilla Orchids
This species of orchid is native to tropic-like climates throughout various regions in Central America. Vanilla bean orchids require hot temperatures.
This type of orchid requires temperatures between 80 and 100 degrees Fahrenheit during the day, and at night the temperature should not drop below 50 degrees Fahrenheit.
Vanilla Bean Orchids and Humidity
Since vanilla orchids are native to tropical climates in Central America, this orchid requires high-humidity levels.
The humidity for this kind of orchid should be 80%.
This level of humidity can be hard to maintain indoors, especially in most spaces that are impacted by cold and dry winters.
To help maintain a 80% humidity level for your vanilla bean orchid, you should consider placing a humidifier in the area that your orchid is in and also regularly water your orchid. You can also place a fan in the room to help improve air flow.
Is Your Orchid Growing Vanilla Beans?
If you succeed and master proper vanilla orchid care, then your plant may begin to grow vanilla beans. It may take a number of years before you notice your vanilla orchid starts growing vanilla beans. In most cases it takes at least 3 years before your orchid will grow any beans.
You will notice that vanilla beans begin sprouting usually from October to March.
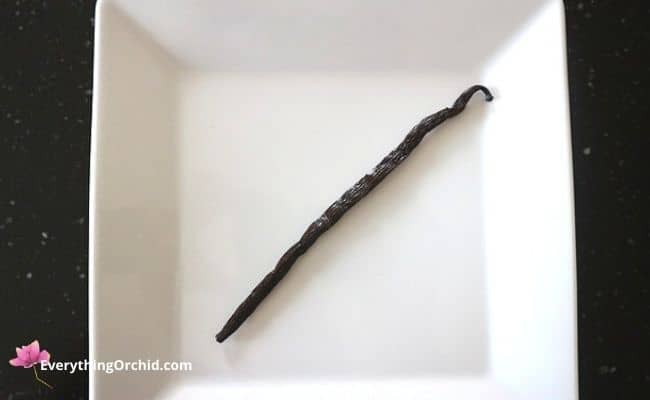
During this time, you may notice bean-like pods sprouting from the blooms of your orchid. The pods are normally green.
Extracting and Curing Vanilla Beans
When the vanilla bean pods on your orchid blooms reaches 6 inches long, you should harvest and extract it from your orchid. You should be able to pull the pod off with little force.
After extracting the vanilla bean from the plant, you will then want to begin the process of drying out and curing the vanilla bean.
Curing Vanilla Beans after Extraction
After you have extracted vanilla beans from your vanilla orchid, you will want to begin curing the beans. The curing process for vanilla beans is a very time consuming thing. It may take weeks, and even months, to fully cure a vanilla bean.
To cure your vanilla bean, you should wrap the pod in a dry paper towel and place it in direct lighting. You can use heating lamps to help with the curing process.
Be sure to change the paper towel everyday and wrap the vanilla bean in a new one. The paper towel helps in absorbing moisture from the bean.
Repeat the process of wrapping your pods in new paper towels and placing them under warm lights each day.
The curing process may take anywhere from 6 to 8 weeks. Once the beans are brown and completely free of moisture, then you should place the dried-out bean in a dark area for 1 to 2 months.
After the curing process is complete, you can use the vanilla beans to make vanilla extract and other homemade goods.
7 Ways to Use Your Homegrown Beans
If you have a orchid that is producing vanilla beans and you take the time to cure them, then you can use your homegrown vanilla beans to make homemade goods.
Here are 7 different ways you can use your homegrown vanilla beans:
- Make homemade vanilla extract
- Making Vanilla Ice cream
- Making your own vanilla sugar
- Create your own vanilla-flavored coffee
- Make your own vanilla body scrub
- Making vanilla-infused vodka
- Baked Goods
1. Make Vanilla Extract
One of the best ways you can use your homegrown vanilla beans is by turning them into vanilla extract.
There are many different ways you can use vanilla extract, including making many different baked goods and even for body care items, or scented candles.
Making vanilla extract is easy, but is a time-waiting process.
There are 2 key ingredients you need for making vanilla extract including:
- 6-8 vanilla beans
- 1 cup of vodka
You will also need a jar (at least 8oz.) and a lid.
To make vanilla extract:
- Start by cutting the vanilla beans all the way down the middle of the pod
- Place the cut vanilla beans in a mason jar (you may have to cut the beans in order to completely fit)
- Dump the vodka in the jar with the vanilla beans
- Place a lid on the jar
- Store the jar in a dark place for 2 to 3 months (or longer if you desire a stronger vanilla taste)
Be sure to check your vanilla extract a few times a week during those months and shake the jar. This will help in submerging the vanilla beans in the vodka for a better flavor.
After the 2 or 3 months are up, you should have a vanilla extract that is ready to use for many more homemade goods.
2. Make Homemade Vanilla Ice Cream
After you make your own vanilla extract, you can use it to make homemade vanilla ice cream. This is a sweet treat that pairs well with almost any kind of dessert.
To learn how to make homemade vanilla ice cream with your vanilla extract check out this article on homemade vanilla ice cream.
3. Make Your own Vanilla Sugar
You can also use your vanilla beans to make your very own vanilla sugar. Vanilla sugar is great for baking, especially if you want to make goods such as cookies or cakes.
To make vanilla sugar, you will need:
- Vanilla beans
- Sugar
- Food processor
- Jar
For every 2 cups of sugar, you will need one vanilla bean.
To make vanilla sugar start by placing dried-out vanilla beans and sugar in a food processor.
After combining the vanilla beans and sugar together, you should proceed to blend the mixture. Blend the beans and sugar until a fine mixture forms.
Once your sugar-mixture is to desired grated levels, place it in a jar and your vanilla sugar is ready to use!
4. Create Your Own Vanilla-Flavored Coffee
To make your own vanilla-flavored coffee, you will have to first make vanilla flavored syrup.
For this process you will need:
- 2 Vanilla beans
- 4 cups of water
- 4 cups of sugar
- 1 teaspoon of vanilla extract
- 1 jug
- 1 cooking pot
To make vanilla flavored syrup:
- Combine vanilla beans, water, and sugar in a medium-sized pot
- Boil the pot on a medium heat for 5 to 10 minutes
- Place the vanilla syrup in a jug
- Finally, place the jug in the fridge and cool
After the syrup is cold, it will be ready to make vanilla-flavored coffee. Simply add a splash or two of the vanilla syrup to your coffee for flavoring.
5. Make Homemade Vanilla Body Scrub
Spoil yourself and give yourself a spa day by making your very own vanilla body scrub. Vanilla body scrub can be a refreshing treat that is easy to make right at home. This scrub will be good for exfoliating all parts of your body.
If you have made your own vanilla extract, then this is something fun you can consider doing.
In order to make vanilla body scrub you will need:
- 1 cup of sugar
- 6 tablespoons of olive oil
- 1 teaspoon of vanilla extract
- 1 Jar
Combine the sugar, olive oil, and vanilla extract together. You should mix these together. After you have mixed all the ingredients together, place it in a jar and your vanilla body scrub will be ready to use.
A little of this scrub goes a long way. You will only need a few teaspoons of this scrub for each section of your body. When using, wet the area you are going to use the scrub, then begin gently scrubbing the area with the vanilla body scrub. At the end, you should rinse any areas you may have used the scrub on.
6. Make Your own Vanilla-Infused Vodka
Making vanilla-infused vodka is easy and a great way to use your homegrown vanilla beans. For this process, all you need is one vanilla bean and your favorite kind of vodka (750 ml bottle).
Open the bottle of vodka and place the vanilla bean inside. You then recap the bottle and let the vanilla bean soak in it for 2 to 3 weeks (the longer you let it soak, the stronger the flavor will be).
After a few weeks, you will have delicious tasting vanilla flavored vodka.
7. Baked Goods Infused With Vanilla Extract
If you have your own homemade vanilla extract, then what better way to use it than by making baked goods.
There are many different kinds of baked goods that require vanilla extract in their recipes.
Cookies, cakes, pies, you name it! Vanilla extract is a popular spice in the baking world and you will surely be able to find something tasty and delicious to make with this spice.
How to Extract Vanilla Beans From Vanilla Orchids: Summarized
By now you have made it to the end of this article and have learned everything on vanilla orchids and how to extract vanilla beans.
If you want your vanilla orchid to grow any beans you will have to:
- Make sure your orchid is receiving proper care
- Be patient
If you want any chance at all for your vanilla orchid to grow beans, you will have to make sure your orchid is receiving:
- Proper amounts of light (preferably the morning sun and shade the rest of the day)
- Your orchid is being watered properly (keep soil and potting medium damp)
- The temperature is at least 80 to 100 degrees Fahrenheit
- Humidity levels are at least 80%
- You regularly fertilize your orchid
- Your orchid is potted in bark and moss mixtures
If you give your vanilla orchid proper care, you will begin to see vanilla bean growth after 3 years.
A mature vanilla bean pod will reach 6 inches in length, indicating that you should extract it from your blooms and begin the curing process.
Curing the vanilla bean is a hard process and can take weeks to complete. To cure your vanilla beans wrap it dry paper towels and place under a heating lamp or direct sunlight. Repeat this process for 6 to 8 weeks.
After you have dried out your orchid beans and completely cured them, you can use your vanilla beans to make a variety of homemade goods including vanilla extract, vanilla body scrub, vanilla flavored coffee, and much more.
I hope you have found this post interesting and helpful, thank you for reading how to extract vanilla beans from vanilla orchids!
